Goodbye Wordpress Hello Snow
Posted by Filip Ekberg on 21 May 2014
As per my previous post I've moved to Azure and this has been a really interesting experience so far. Not only did it force me to learn more about the offerings of Microsoft Azure, but I also came to the conclusion that moving away, as far as possible, from Wordpress was about time.
Why?
After I had migrated to Microsoft Azure with my Wordpress blog I looked closely over how the average response time increased for the site, compared to what I had on my previous server. It wasn't until I published another WebSite on the same Instance that I noticed that I didn't really have to live with the long load times.
The website where you can buy C# Smorgasbord as an ebook is written in ASP.NET and runs on that same instance. Interestingly enough it loads in about 200-300ms, depending on where you are of course. My tests were consistent and the tools I use to monitor my websites told me the same; this site performed 600-700ms better than my blog running Wordpress.
Of course, the content is different. Does the content difference justify an additional 600-700ms to just load the first page? I think not.
My comments were already moved to Disqus so what else did I have on my blog that needed to be dynamic? Turned out that the only two things that I had was Search and E-mail subscribers via Wordpress. Fortunately for me, most of you read my blog by navigating directly to it or by subscribing to the RSS feed. For those of you that have been subscribing to the blog via E-mail, I suggest subscribing to the RSS instead, or follow me on twitter to get updates when I post new stuff. I might setup a third-party E-mail service later on, but it is not on my radar today.
Given that I could skip the importance of E-mail subscription, I only had the search left to worry about. I went over to Google analytics to see how many of you actually use the search and guess what? Most of you don't. If you want to find something on the blog I bet you just Google for it, which is a better search engine than what I had on the blog, right?
If we remove e-mail subscribers and search, all that is left is static content. So why would I use something as heavy as Wordpress to serve that? I don't know and that is why I decided to say goodbye to Wordpress.
Choosing a new blog engine
After a bunch of discussions on JabbR I came to the conclusion that I wanted to go with a static file hosting plan as suggested by a lot of the frequent users I looked up Snow.
My only worry was that it would be hard for me to migrated from Wordpress to a new blog engine, so my first goal was to find out how much trouble I was in if I wanted to do this. Snow is inspired by Jekyll, a blog engine that relies on Markdown. When it processes the markdown files it generates static html files for you.
Snow is open source, and available on github. This makes it easy for me to extend it if is so choose. It's also built on Nancy (Yay!).
Converting all the content to "Markdown"
Getting all my content converted to markdown meant that I had to export everything from Wordpress. I had already gone through the trouble as you saw in my previous post to add all the images to the Azure Storage/CDN. This means that I can point to the same resources, I just need to convert all the content into files that Snow understand.
I found another tool, also open source, called wpXml2Jekyll. To my surprise it was written in C# which made it very easy for me to tweak it to my liking. As Wordpress handles re-writing all image sources to point to the CDN, I had to manually swap all the links out to point to that. I had also invested a lot of time in writing SEO Titles and Meta Descriptions for each post on my blog, and I wanted to persist this.
Set out to convert my blog to markdown files, I started the conversion and it turned out great!
The result was OK, actually better than OK, it would have taken me so much longer to extract my 150 posts manually. When writing my posts using Wordpress I had used a plugin to insert code snippets, so all my code snippets were surrounded by something looking like this:
[cc lang="c#"]
var x = 10;
[/cc]
If that was all, it would have been easy. However I also had inline code in text that looks like this:
Some text that talks about [cc lang="c#" inline="true"]dynamic[/cc]
In other cases it might be a different language than C# and the attributes might be in different order. After spending an hour or so trying to parse that with regex, I gave up and found myself tweaking all 150 files manually, looking for those code snippets. To make it proper markdown the multiline code needs to be tabbed and the inline ones uses `. This took some time though, I spent more than a couple of hours going over all the files.
I say "markdown" because it is not proper markdown, the files still have HTML inside them so that was not converted, but that doesn't matter because it still works.

All posts are now markdown, now what?
Having all the content made it easy enough to start playing with Snow, I wanted to replicate my current blog as close to 100% as possible.
So far this is where I am at:
- All images are stored in Azure Storage and will continue to be there even after Wordpress is purged
- All posts are in markdown that renders content correctly, including linked images
- Comments already migrated to Disqus
- Sharing (ShareThis) relies on equal domain and path name
Setting up Snow
Now that I had everything in place all that was left was to get Snow to convert this all into proper HTML. You can get started with Snow by either forking the repository or downloading the pre-compiled assemblies and binaries, I did the latter because I had some initial problems compiling it out of the box.
Folder structure
The root folder for my Snow site has two things at the moment:
- compile.snow.bat
- Snow
The second one being Snow with all its content. I have it like this because after running the compile.sno.bat I want to have a folder created called Website making the structure look like this:
- compile.snow.bat
- Snow
- Website
Just makes it a bit tidy. What is interesting though is the Snow folder itself, it contains 4 interesting things.
_compile
This folder is where all the Snow magic is stored. It contains the executable and the assemblies it relies on; such as Nancy.
Notice that we have Nancy.ViewEngines.Razor.dll in here. Yes, you guess right, you can write your theme in Razor!
_posts
In the _posts folder we put all the posts that we want to publish. This is where we directly put our markdown files as you saw in the screenshot above in this post.
themes
As I have my posts, all I need is to create my theme. This is where we do just that. I am a ASP.NET guy and I really enjoy working with Razor. Snow lets me do this and we can even have multiple themes! I created a theme that I call fekberg.
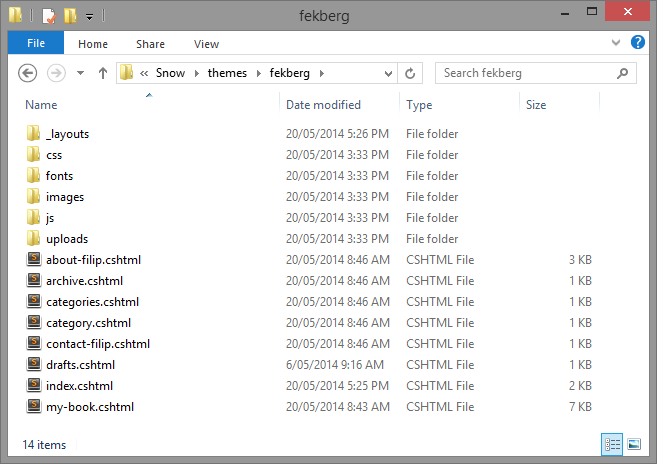
As you see a bit further into the folder structur we have a _layouts folder, in this we put our "master page", also know as the Layout file in ASP.NET MVC.
We can also define templates for certain things, such as what a post will look like. As you might now, if you navigate to my blog from a computer using a big enough resolution you will see a sidebar. The sidebar contains an archive of all my posts.
Snow exposes data like this through the Model usable in our Razor views:
<h2>Arch<span>ives</span></h2>
<ul>
    @foreach (var item in Model.MonthYearList)
    {
        <li><a href="@item.Url">@item.Title</a></li>
    }
</ul>
Same goes for the file, post.cshtml that we use to define the post template:
@inherits Nancy.ViewEngines.Razor.NancyRazorViewBase<Snow.ViewModels.PostViewModel>
@using System.Collections.Generic
@{
    Layout = "default.cshtml";

    var url = "https://www.filipekberg.se" + @Model.Url;
}

<div class="post">
    <h1><a href="@Model.Url">@Model.Title</a> </h1>
    <h2>Posted by <a href="/about-filip/">Filip Ekberg</a> on @Model.PostDate.ToString("dd MMM yyyy")</h2>
    @Html.RenderSeries()

    @Html.Raw(Model.PostContent)

    <div class="post-info-bottom">
        <span class="post-info-category">
            @foreach (var category in Model.Categories)
            {
                @:| <a href="/category/@category.Url">@category.Name</a>
        }
        </span>
    </div>
    @Html.RenderDisqusComments("fekberg")
</div>
Compare this to the PHP-file that you have to work with when developing for Wordpress.
Of course we can define pages as well, I've created about-filip.cshtml which is converted into /about-filip/ after Snow has processed it.
Having showed you a bit about how I setup my template, you might wonder how Snow knows what is a new page, what template to use and how to do configurations? Well, keep on reading, that is in the snow.config.
CNAME
This is a rather simple file, it only contains the blogs CNAME which in my case is blog.filipekberg.se.
snow.config
The config is where the magic happens, this is where we define what goes where and what uses what. I can for instance set the following things:
- Blog Title
- Site URL
- Author
- Posts folder (
_post) - Layouts folder
- Theme name
- Output
- URL Format
- Which directories to copy from the themes folder
- Which files and how to process each file
The URL Format was important to me, I wanted everyone that linked to my blog to still be able to link to the same content. This was truly the most important part as it would otherwise break everything.
My snow.config looks like the following:
{
  "blogTitle": "Filip Ekberg's Blog",
  "siteUrl": "https://www.filipekberg.se",
  "author": "Filip Ekberg",
  "email": "[email protected]",
  "posts": "_posts",
  "layouts": "_layouts",
  "theme": "fekberg",
  "output": "../Website",
  "urlFormat": "yyyy/MM/dd/slug",
  "directoryname": "",
  "copyDirectories": [
    "images",
    "uploads",
    "js",
    "fonts",
    "css",
  ],
  "processFiles": [{
    "file": "index.cshtml",
    "loop": "Posts"
  },{
    "file": "category.cshtml",
    "loop": "Categories"
  },{
    "file": "categories.cshtml => category"
  },{
    "file": "archive.cshtml"
  },{
    "file": "my-book.cshtml => my-book"
  },{
    "file": "about-filip.cshtml => about-filip"
  },{
    "file": "contact-filip.cshtml => contact-filip"
  },{
    "file": "rss.xml => rss",
    "loop": "RSS"
  },{
    "file": "feed.xml => feed",
    "loop": "atom"
  }]
}
As you see here I tell it to put about-filip.cshtml after it has been processed into /about-filip/.
Going For a Test Run
My files were clean enough so it was easy for me to extract my theme from Wordpress to the Snow template. After having done that and put all my markdown files into the _posts folder I executed compile.snow.bat.
This file contains the following:
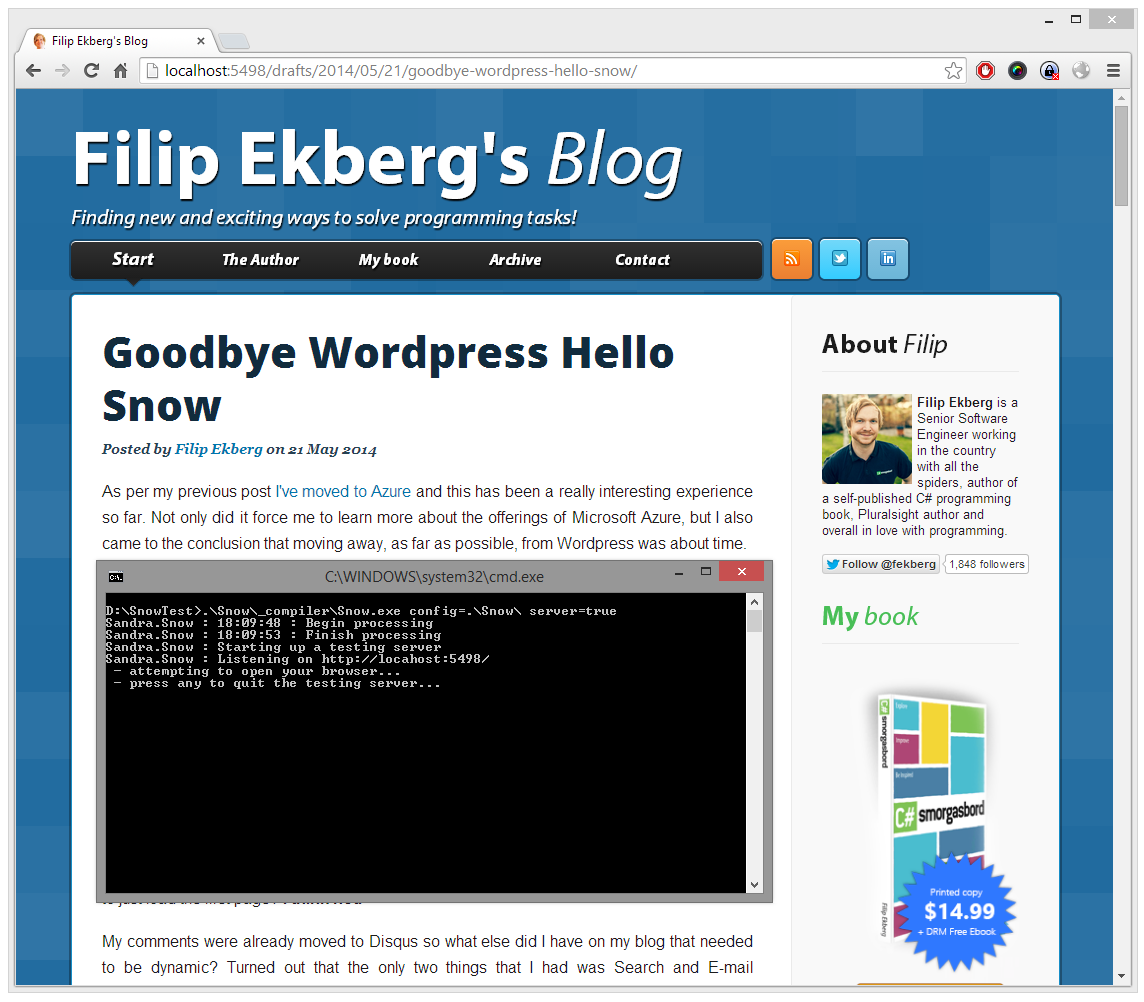
.\Snow\_compiler\Snow.exe config=.\Snow\ server=true
Make note of serve=true this will tell Snow to serve the files after it has processed the site which makes it easy to test locally. Running that shows me something like this (note that I navigate to this post as a draf! blog-ception!):
Looking pretty good, right?
This way I could develop everything locally and make sure that it all looked good. At this stage my blog looked exactly like I wanted, the version now running on Snow that is. As I was ready to test it on Azure it hit me that I want to make it as easy as possible for me to upload new posts in the future.
Preparing Microsoft Azure and your Github Repository
The Wordpress version of the blog runs on Azure and now that I have my Snow version ready, I want to get this all setup for continuous delivery. This means the following:
- My Snow version of the blog will be hosted on for instance Github
- When I commit something to the repository, Azure pulls it down and compiles/processes the code according to the deployment configuration
- When the compilation is done, the new versions of the static files are published to the webroot
It was also important to me that I could get images uploaded to Azure Storage, as this is where my CDN points to. As you could see in the snow.config from above, I have a directory inside my theme called upload (.\Snow\themes\fekberg\uploads). When deployed by Azure this is the folder that I want pushed to Azure Storage. More about that particular code in just a moment.
I like testing my setup, code and deployment strategy on a demo site before I do the same changes to the live site. That means that I had to setup an Azure WebSite to test this with. I called this fekberg-snow and choose to put it in my current hosting plan, which is the same hosting plan that I use for the blog that was already live.
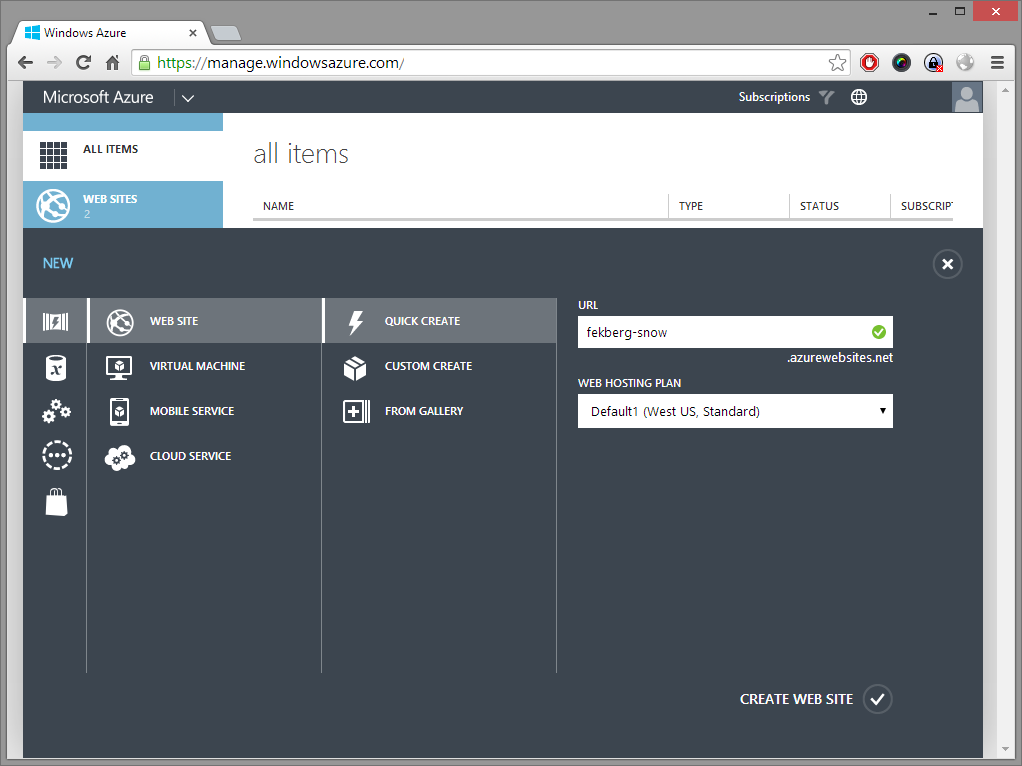
Creating the Github repository
Now that we have the Azure WebSite, we want to enable it to pull the website code from Github. There are multiple providers that you can use, but I prefer github for this. You'll have to prepare the github repository with the following:
- Create a new Repository, I called mine the same as my CNAME to make it easier to identify
- Add the folder
Websiteto your.gitignore - Commit the code from the root of your Snow site, that means
Snowandcompile.snow.bat, don't commit your static HTML files though, that will just make it messy; hence why you should have added it to the.gitignore
I've got my Snow version of the blog publicly available on my github site here: github.com/fekberg/blog.filipekberg.se
Have a peak around that if you're stuck getting it to work.
Preparing the Github Repository for Automatic Deployment
Azure will download the contents of the repository and look for a .deployment file. In order to prepare the repository for this I had to create this file and tell it what to do when Azure deploys. You have a bunch of settings you could possibly do here, but I just simply told it to execute a simple command like this:
[config]
command = compile.snow.bat
You might think that compile.snow.bat looks the same as before, I can tell you it does not. Azure uses Kudu and we can create a deployment script that leverages from this. It's not particularly important exactly what is going on in the script, but by changing it we can hook into what goes on during deployment.
@echo off

setlocal enabledelayedexpansion

SET ARTIFACTS=%~dp0%artifacts

IF NOT DEFINED DEPLOYMENT_SOURCE (
  SET DEPLOYMENT_SOURCE=%~dp0%.
)

IF NOT DEFINED DEPLOYMENT_TARGET (
  SET DEPLOYMENT_TARGET=%ARTIFACTS%\wwwroot
)

echo Start - Building the Snow Site
echo Running Snow.exe config=%DEPLOYMENT_SOURCE%\Snow\

pushd %DEPLOYMENT_SOURCE%
call  .\Snow\_compiler\Snow.exe config=.\Snow\

IF !ERRORLEVEL! NEQ 0 goto error

mkdir %DEPLOYMENT_SOURCE%\Website\feed
copy %DEPLOYMENT_SOURCE%\Website\feed.xml %DEPLOYMENT_SOURCE%\Website\feed\index.xml

mkdir %DEPLOYMENT_SOURCE%\Website\rss
copy %DEPLOYMENT_SOURCE%\Website\rss.xml %DEPLOYMENT_SOURCE%\Website\rss\index.xml


call  .\MoveFilesToAzureStorage\MoveFilesToAzureStorage.exe

IF NOT DEFINED NEXT_MANIFEST_PATH (
  SET NEXT_MANIFEST_PATH=%ARTIFACTS%\manifest

  IF NOT DEFINED PREVIOUS_MANIFEST_PATH (
    SET PREVIOUS_MANIFEST_PATH=%ARTIFACTS%\manifest
  )
)

echo Setting up Kudu Sync

IF NOT DEFINED KUDU_SYNC_COMMAND (
  :: Install kudu sync
  echo Installing Kudu Sync
  call npm install kudusync -g --silent
  IF !ERRORLEVEL! NEQ 0 goto error

  :: Locally just running "kuduSync" would also work
  SET KUDU_SYNC_COMMAND=node "%appdata%\npm\node_modules\kuduSync\bin\kuduSync"
)


echo Kudu Sync from "%DEPLOYMENT_SOURCE%\Website" to "%DEPLOYMENT_TARGET%"
call %KUDU_SYNC_COMMAND% -q -f "%DEPLOYMENT_SOURCE%\Website" -t "%DEPLOYMENT_TARGET%" -n "%NEXT_MANIFEST_PATH%" -p "%PREVIOUS_MANIFEST_PATH%" -i ".git;.deployment;deploy.cmd" 2>nul
IF !ERRORLEVEL! NEQ 0 goto error

goto end

:error
echo An error has occured during web site deployment.
exit /b 1

:end
echo Finished successfully.
I didn't want to leave you out of any juicy details so sorry about having to scroll down here to continue reading. Most of the contents of that script is from a template, it simply moves files around based on if the compilation was successful or not.
There are three interesting things here in particular.
Building the Snow Site
In order to build the Snow site, we navigate to the deployment source, this is where Azure downloaded all our files. After that we simply tell it to compile the Snow site as we have seen before.
pushd %DEPLOYMENT_SOURCE%
call  .\Snow\_compiler\Snow.exe config=.\Snow\
Persist a URL for /feed/
The Wordpress blog let you go to /feed/ and I didn't want my users that subscribe to that feed to be left out. So I simply create a folder and copy two index.xml files over to those folders. You also have to enable that in Azure to be a document root!
mkdir %DEPLOYMENT_SOURCE%\Website\feed
copy %DEPLOYMENT_SOURCE%\Website\feed.xml %DEPLOYMENT_SOURCE%\Website\feed\index.xml

mkdir %DEPLOYMENT_SOURCE%\Website\rss
copy %DEPLOYMENT_SOURCE%\Website\rss.xml %DEPLOYMENT_SOURCE%\Website\rss\index.xml
Moving files to Azure Storage
While we are looking into the deployment script, you might as well look at the line:
call .\MoveFilesToAzureStorage\MoveFilesToAzureStorage.exe
This calls a program, available on my github page that lets you upload files to Azure Storage. I'll go into more detail in just a moment when we are looking at how to setup Azure for this automatic deploy! Just keep in mind that we have this file executed from the deploy script. To make this work, this also requires you to have that file in your repository, download the source and compile it or download the executable from my blog's repository.
The rest of the file contains Kudu specific things and is not particularly interesting to us right now to get this to work.
Push to github!
Setup Azure to Automatically Deploy
Everything is ready on the Github side of things, everything is ready content wise, we just need to deploy!
Adding App Settings and Connection Strings
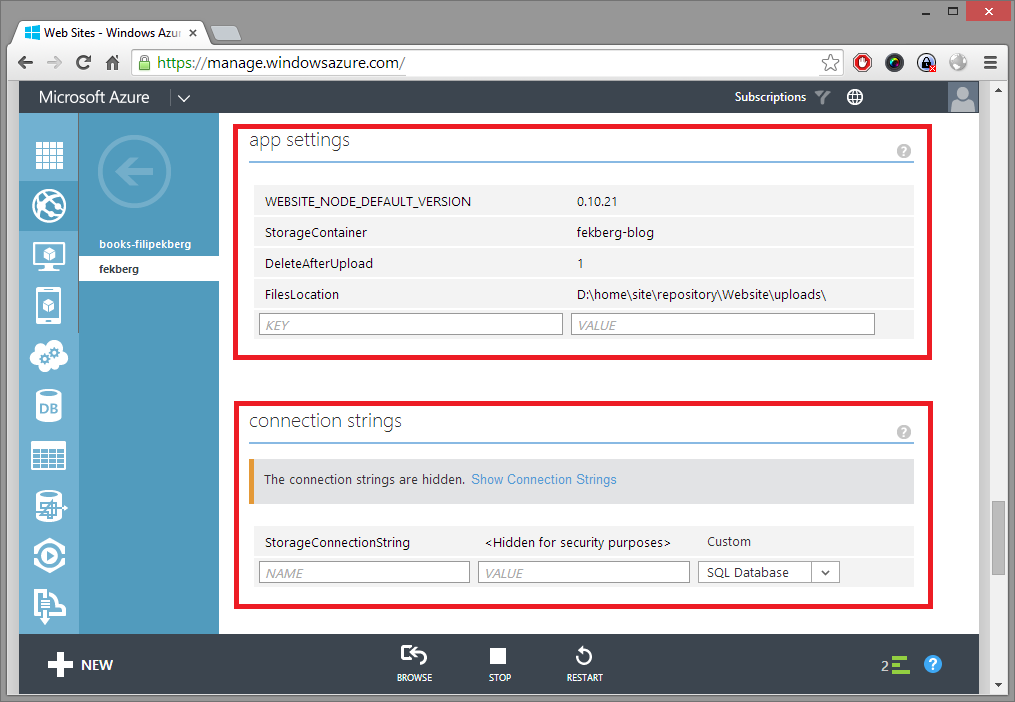
Before hooking up Github, we need to add some connection strings to make the Azure Storage part to work. I have a storage with a container in it called fekberg-blog. This is what is distributed to my CDN. You will have to add the following settings to make the deployment to Azure Storage work:
- StorageContainer
- FilesLocation
- SotrageConnectionString (ex.
DefaultEndpointsProtocol=http;AccountName=[AccountNameHere];AccountKey=[AccountKeyHere])
Here is an example of what that looks like; this is found in the Web Site portal under "Configure":
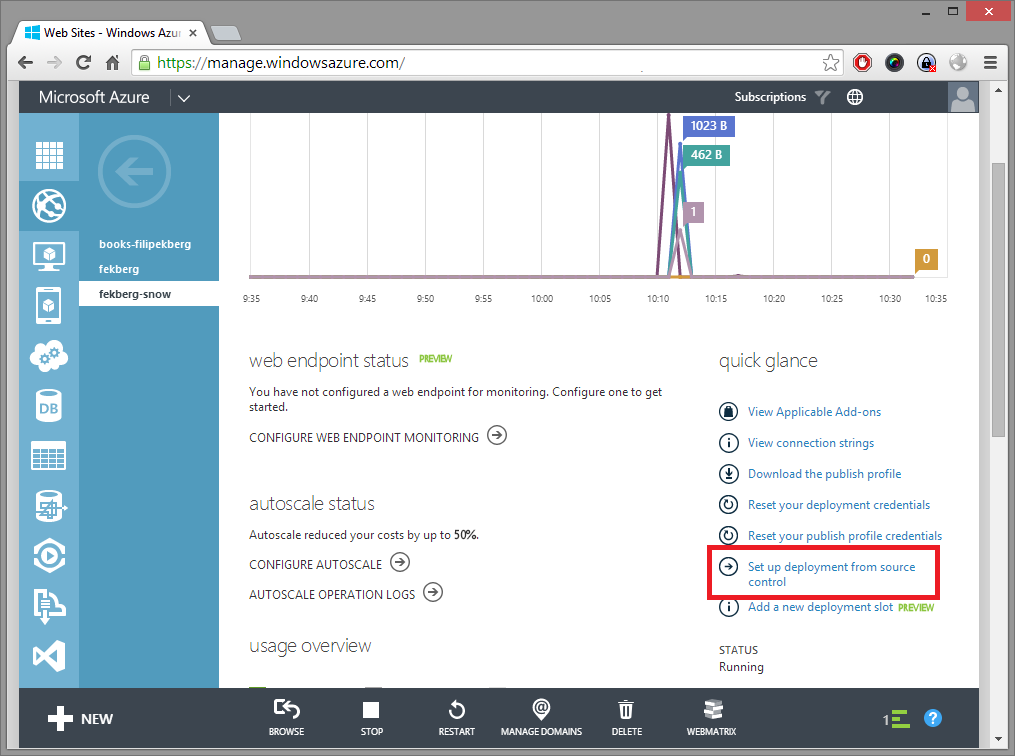
Set up deployment from source
When in the dashboard of my Website, I simply scrolled down or look for "Set up deployment from source" and clicked that.
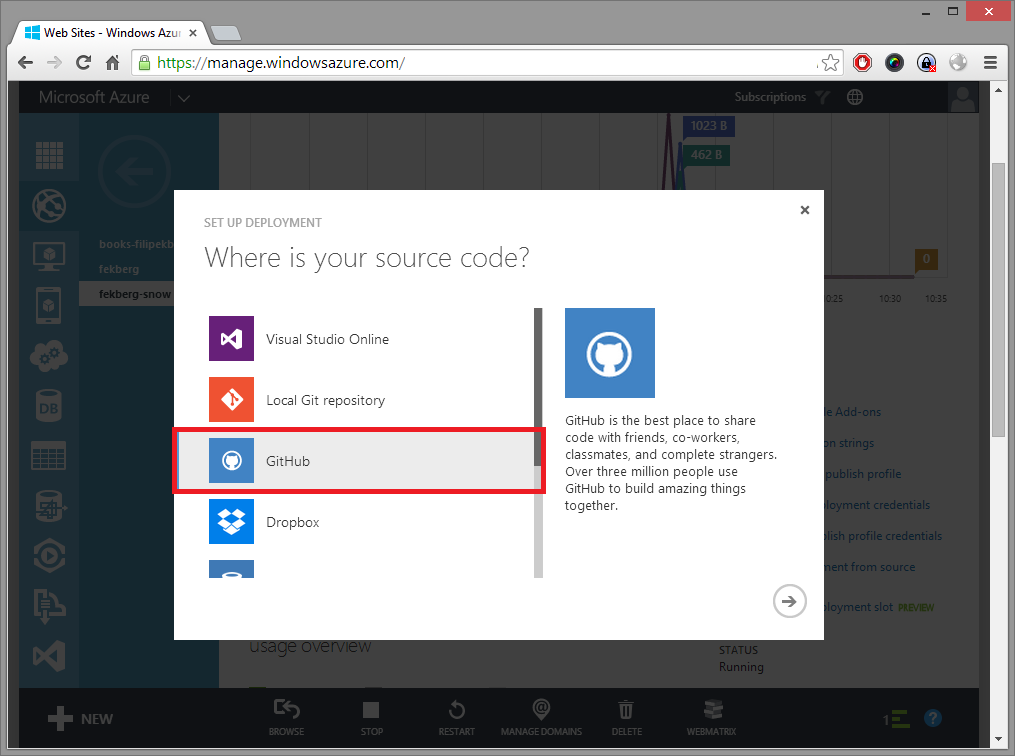
Where is Your Source Code?
After clicking that, I was prompted with a selection to choose the provider of where my code is locatated. As I've pushed it to github, that is what I choose here as well.
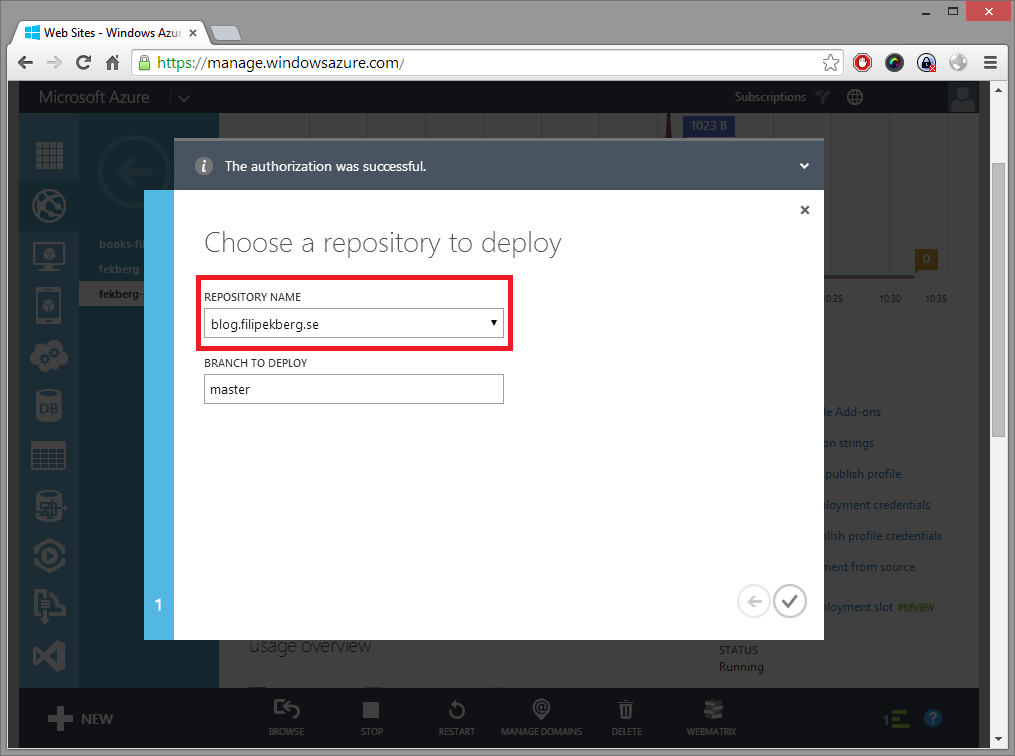
Choose a Repository to Deploy
I was prompted to authenticate with Github, when that was all setup I was allowed to select repositories and branches. In my case, I was deploying from blog.filipekberg.se.
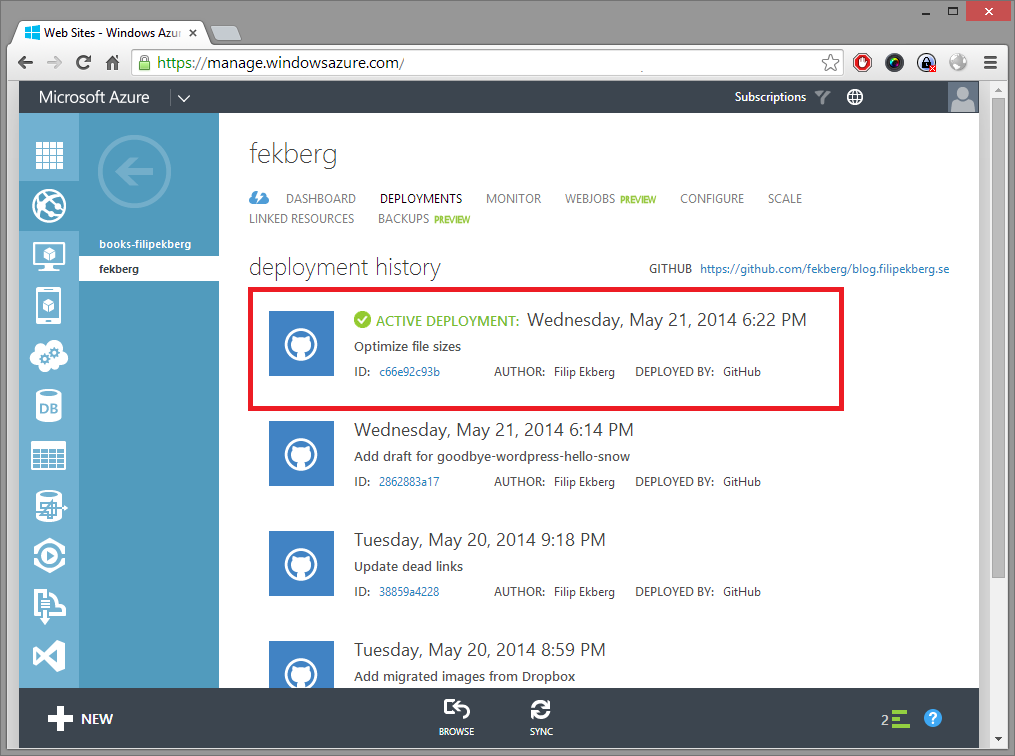
Website is Now Deployed!
We can verify that the deployment was successful in the "Deployments" section of the Azure WebSite. The files from the upload folder are now in Azure Storage and the files that Snow produced, are now in the wwwroot!
I'm now using Snow and couldn't be happier!
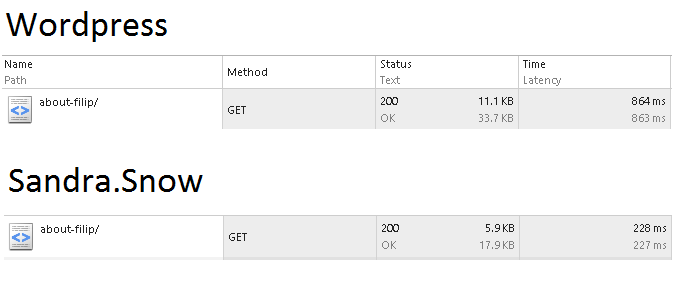
The live site has been using Snow now for just a little over a day and so far it has been a tremendous speed improvement. It's not really that odd because it is just static files. All this means that I scale better if I need to and you can access the site faster. It's a win - win!
I compared some loading times of the same page between the Wordpress site and the Snow site, both relied on the same Azure CDN for other content. However, the time it took to download the HTML which was rather static for the same page on the two different systems is rather different.
I really hope you found this blog post informative. I spent some time writing down my thoughts during the process of deploying the site using Snow and the things I learned in Azure while doing so. It's been fun and writing content feels much easier and more fun now for some reason.
If you've read this far, thank you I really hope you leave a commen, If you consider migrating your blog or starting a new blog, I really recommend Snow.
I'll leave you with a set of links to sum up what I've linked above:
- blog.filipekberg.se on Github
- Snow on Github
- SnowTemplate on Github
- Move Files to Azure Storage program on Github
Goodbye Wordpress and Hello Snow!
comments powered by Disqus
 Filip Ekberg is a Principal Consultant at fekberg AB in the country with all the polar bears, Microsoft C# MVP, author of a self-published C# programming book, Pluralsight author and overall in love with programming.


