Creating a Windows Metro style application in C++
Posted by Filip Ekberg on 02 May 2012
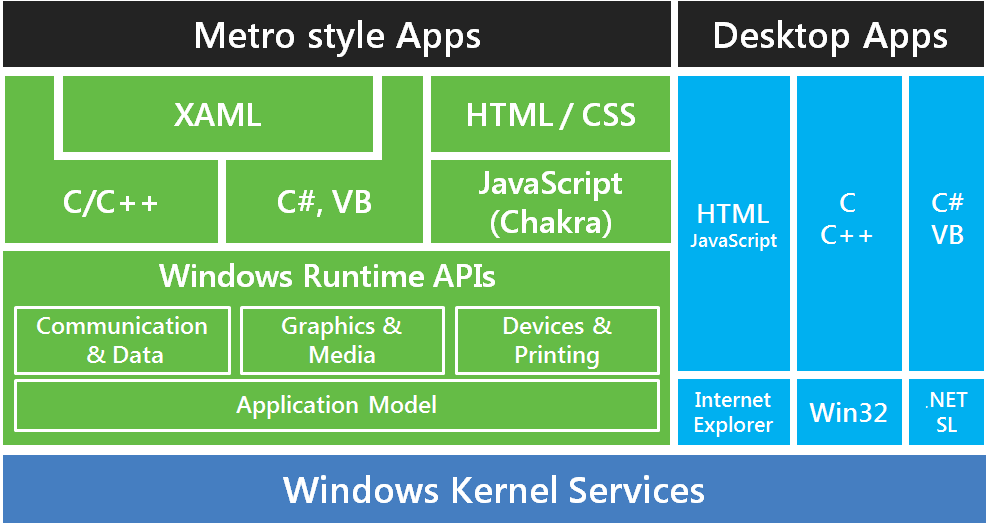
I am going to step out of my comfort zone a bit and write a post that touches the surface of C++ in Windows 8. Let us start off by looking at an image of what the new WinRT(Windows Runtime) look like:
As you can see, there are a lot of powerful ways to create both metro style and desktop applications. Notice that in Metro style applications, XAML is connected to both C++ and C#/VB.
During my years of .NET development, the reason for using C# or VB has been; RAD(Rapid Application Development). In a world filled with consultants where the customers only see the end result, it can often be hard to convince that putting down 200% more time using C++ is a great idea.
Because let's face it, it takes a lot more time creating a desktop application in C++ using MFC than what it would to use C# and XAML. Before someone throws a stick at me I have to say that it of course depends on what kind of application you are creating.
The downside from using a managed programming language is that it tends to be a bit slower; in some cases this is critical. Most customers do not care if they have to wait a couple of extra nano-seconds for a control to render.
What does this have to do with Windows 8 and the Windows Runtime?
I really got a nice tingly feeling in my stomach when I first saw that you could use XAML with C++ in Windows 8. But that is not the best part, the best part is that it is fully native!
This means that the designers can make the interface in expression blend and we can dig down into C++ on the backend.
Let us have a look at this! You will need to have Windows 8 Consumer Preview and Visual Studio 11 beta installed (or later) in order follow these examples.
Start off by creating a new blank Windows Metro style application, this is found under "Other languages -> Visual C++":
When the project is created, you will see some files that have been generated, these are pretty similar to what we are used to see in a normal XAML application in .NET:
Open up the file "BlankPage.xaml", this will bring you into the designer view of the XAML file. Add a TextBlock to the page:
As you can see in the preview, it shows a tablet with the current view inside it. Remember that we are working with a Metro application, the idea is that you have a metro application in fullscreen or pinned to one of the sides on your screen.
By only adding the TextBlock, this is the XAML that we have now:
<Page
    x:Class="WinRTDemo.BlankPage"
    xmlns="http://schemas.microsoft.com/winfx/2006/xaml/presentation"
    xmlns:x="http://schemas.microsoft.com/winfx/2006/xaml"
    xmlns:local="using:WinRTDemo"
    xmlns:d="http://schemas.microsoft.com/expression/blend/2008"
    xmlns:mc="http://schemas.openxmlformats.org/markup-compatibility/2006"
    mc:Ignorable="d">

    <Grid Background="{StaticResource ApplicationPageBackgroundBrush}">
        <TextBlock x:Name="MyTextBlock"></TextBlock>
    </Grid>
</Page>
If we now navigate to the file "BlankPage.xaml.cpp", this is where we can actually access the TextBlock. When you compile your solution, the XAML will also be compiled to C++, just like the XAML in a normal .NET application is compiled.
However, to access the TextBlock and set the text of it to the current date, what do we write?
The TextBlock is actually a TextBlock^, the "^" is called a "hat". Think of this as a pointer, but a pointer that you do not have to worry about disposing.
This means that you do not have to do delete on the object yourself, because it will be automatically removed once the context of it has been exited.
So in order to set the value of the TextBlock we do:
MyTextBlock->Text = "Hello World!";
We can test-run this before we display the current time. First, let's select to run it in a simulator like this:
This will bring up a tablet emulator that mirrors your system:
Now let's take a look at how to get the current date there instead of that "Hello World!" text. In WinRT you can access an object called Calendar which you can use to get the date and time.
In order to get a pointer/hat, you need to modify the instantiation a tiny bit. Instead of just writing this:
new Calendar();
You write:
ref new Calendar();
This lets the compiler know that this will in fact be a hat/"managed pointer". Something that I have missed a lot when not working in C# is the keyword var and this has finally come to C++ with the more appropriate name auto.
So in order to get a calendar object, calibrate it to the current time and then set the text to the current date we can simple do it like this:
auto calendar = ref new Windows::Globalization::Calendar();

MyTextBlock->Text = calendar->YearAsString() + " " +
                    calendar->MonthAsString() + " " +
                    calendar->DayAsString();
This has been a short post about how to create your first C++ Metro style application in Windows 8 and I hope you enjoyed the read, if you have any questions do not hesitate to leave a comment, tweet or e-mail.


 Filip Ekberg is a Principal Consultant at fekberg AB in the country with all the polar bears, Microsoft C# MVP, author of a self-published C# programming book, Pluralsight author and overall in love with programming.


